The KNIME CSV Writer Node is an easy & free way to generate CSV files in an automated fashion! In less than 1 minute, you can automate writing a CSV and configure the output.
The KNIME Analytics platform offers various ways to output or write your data to files. Today, let’s learn about the KNIME CSV Writer Node!
Generating a CSV file in information technology or analytics environments is becoming a normal process.
KNIME CSV Writer Node offers you a simple, accurate, and automated means of automating writing CSV files, based on your transformations, filters, and business logic.
CSV’s are great to forward to a team mate – help them get access to the field headers, an understanding of what the data types will likely be in the database, and sometimes a CSV is the only option for an analyst.
Usually, we live in an environment managed by people who think “self service analytics” means – outputting a flat file. This flat file output is what I prefer calling a “dis-service analytics solution” because flat files are not living within the same rule base as a database.
The CSV Writer tool is a single input tool and the output – will be a CSV file. Knime lets you edit how the file outputs, very granular changes, and offers many functionalities you may have never considered before today.
KNIME seeks to help you automate dealing with writing CSV moving forward.
Before we dive into how CSV Writer works, let’s discuss what a CSV File is today in technology.
The CSV Writer node is similar to the Alteryx Output Data Tool – but it’s primarily focused on writing CSVs only.
A CSV file is not “Self service analytics”
Self service analytics comes with an environment that is automated and doesn’t ONLY output spreadsheets. Spreadsheet output is for adhoc analytics, not for enterprise solutions.
And because spreadsheets are not databases, we suffer the consequences of the person before us, and that stands to say any CSV solution today, may have room for improvement.
Let me repeat: “CSV FILE is not Self Service Analytics.”
Once you learn about ACID compliance, and read through what each letters means, from a database perspective. You will quickly understand the value a database provides, and hopefully you will leave your flat file solution architecture in the garbage.
Download a free database, it’s easy to setup, if you’re in analytics and you’ve made it this far without installing a database, hats off to you!
But – now it’s time to grow up – mysql, oracle, sql server, postgresql.
Learn ACID Compliance, (Atomicity, Consistency, Isolation, Durability)
It’s what your analytics need. “It’s what plants need.”
And in this circumstance, when generating a CSV file, I want you to completely understand you’re not going to be solving the same way as if you were writing to a database.
Don’t let this keep you from utilizing a CSV Writer node. However, just let this be a fair warning as you progress your solutions. 9 times out of 10, a database will help you solve for X better, and in time you will understand why!
In one instance, it’s easy to push out a csv in an automated fashion. On the other hand, could your solution be better if you were writing to a database? It depends.
Adhoc analytics – pushing a CSV is very powerful form of kick starting an analytics process, project, and QA.
Using CSV Writer
Jumping into using the CSV Writer is somewhat straight forward when using the KNIME Analytics Platform.
Find the CSV Writer node in the IO parent category under Write.
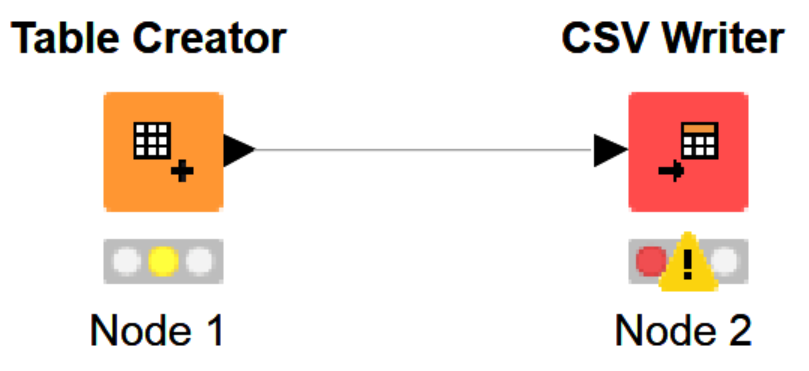
We will attach the KNIME Table Creator Node to our KNIME CSV Writer Node. Notice the error, that’s because we have not configured the node.
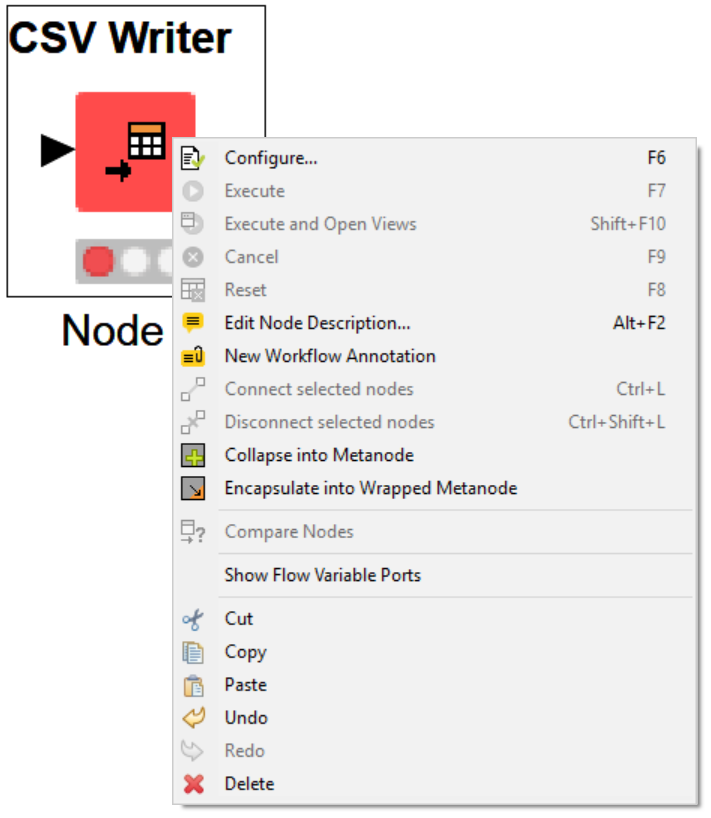
We right click the CSV Writer node to understand the options, left click configure! (or double click to immediately open the node options)
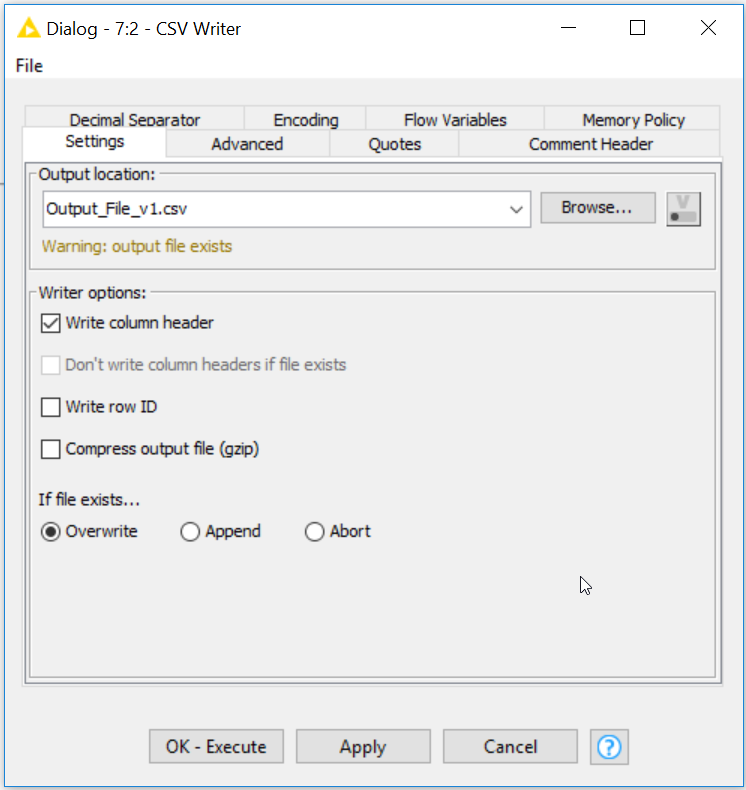
- Output Location: type file name as “Output_File_v1.csv”
- Writer Options: check the box Write Column Header
- If File Exists: click radio button Overwrite
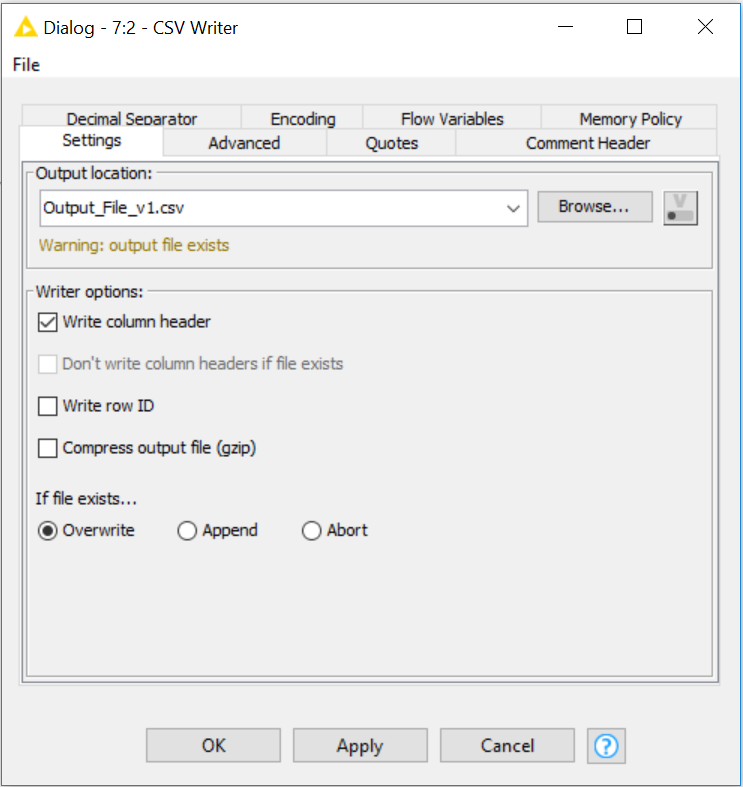
#1, output location: You can browse for the directory you wish to save your file, a normal file browser tool will pop up, navigate, type your intended output location and boom you’re done! (just kidding)
#2, writer options: Write column header, offers an output with sensible headers. Without headers – you’re going to be playing a guessing game. However, header-less CSV writer is helpful when your use case calls for it!
- Don’t write column header if File Exists, very self explanatory. If it doesn’t click for you – play with it until it does.
- Write row ID, self explanatory. Do you want a record ID per row? This will give you a 1, 2, 3, 4… In your output!
- Compress output file (gzip) – if you need to zip your output, here’s the option to do that. However, there’s a zip/unzip node that may be what you need.
#3 if file exists… these 3 options will define your workflows usage and scale-ability. Although these are self explanatory, let me explain what happens when you don’t understand how append works on a flat file.
If your workflow runs, and it fails, you will have appended data to the CSV file, even though there was an error, there isn’t a system to “go get what went into the file because your workflow failed”… which stands to say, if you are depending on append to a flat file, one failure would corrupt your entire automation. Which stands to say it’s not very valuable if used in a workflow that could fail.
Overwrite, means you will lose your file and the data previously stored in the csv file will be gone forever. Append would have kept the original data, and padded the rest of this data transaction to the bottom of the CSV file.
Abort if the file exists, is at least one save grace radio button within this CSV Writer Node output choices. This one step could keep you from deleting previous storage data. However, if you’re going this deep into making a CSV work for you, I recommend you try a database next. A database offers “insert, update, and ACID compliance.”
Configuring the CSV Writer Node
Configuring your CSV Writer node is somewhat painless, however if you’re new to analytics or CSV delimiters, the next few things will be a great set of knowledge to learn, understand, and implement.
Before I dive too deep, check out this cool “flare” that KNIME has available.
Hold CTRL while a configuration window is open, notice it says EXECUTE next to “OK.” Now, while holding CTRL, you can hit ENTER on your keyboard, and KNIME will automatically execute the workflow to this CSV Writer Node.
Once executed, you will see that you’ve overwritten your CSV file, and if you have not executed your workflow yet, you will be writing your CSV for the first time.
Advanced settings – the word “advanced” may give you an indication that this next piece will be really complex. However, setting the separator is something you should not be afraid of because it may be what you need.
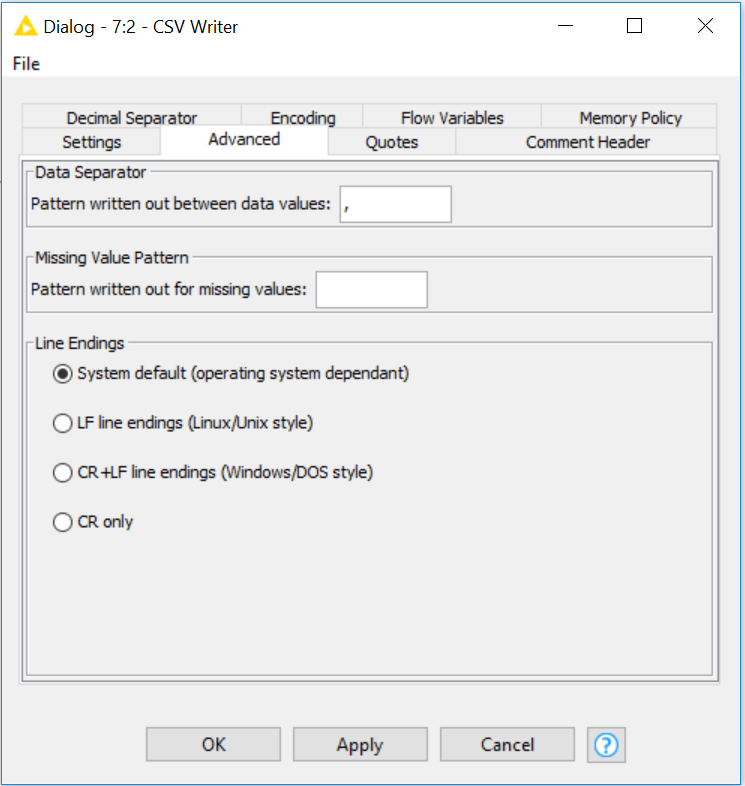
Changing data separator in an automated software… Can’t beat that. You now can change the data separator.
Usecase: maybe you have comma’s in sentence. Sometimes comment data from surveys or comments analysis may offer you a data source that people are using commas naturally, and depending on how these numbers come to you, or to your friends… You may need to change how the data is being separated.
Although… Remember what CSV letters mean before diving too deep. This should be more of a use-case specific advanced configuration. It’s not a norm to change these delimiters but it happens a lot, which it’s good to know about because you’re diving deeper into analytics.
What does CSV mean?
Comma Separated Values, and if someone asks you for a CSV, and you send them TAB delimited or something weird, you’re effectively doing something that did not ask for originally, which stands to say you’re not solving their problem.
So unless you’re a jerk, don’t change how the data is separated, unless the use case specifically calls for it…
Yes, some dude did this to me, and I asked them to google what CSV means and try again! Call me Sassy, that’s fine. Just don’t be cute.
by tyler garrett
Handling Nulls with CSV Writer Node
Missing values are important, right?
These are the values that are considered null, blank, etc.
If you wanted to pad in logic to help identify these “skips” in the data, it’s important to generate that rule here in your advanced settings.
Type whatever you want, write your CSV file, learn what these things mean because it will help you solve better/faster.
Automate Line Endings based on your OS with CSV Writer
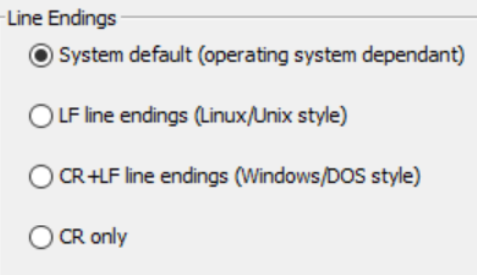
The last portion on the advanced settings setup, has to do with “Line endings” and if you’re not familiar with what that means, I do not recommend making any changes.
Notice these are OS specific, if you’re not on these operating systems, these radio buttons should not concern you!
Leave everything set to default or test/play to understand.
KNIME explains CSV Writer Node
KNIME > Node Descriptions > IO > Write
This node writes out the input data table into a file or to a remote location denoted by an URL.
The node provides many options to customize the output format (see below).
But there is no checking done on the settings, so it is possible to write out the data in a format that makes it impossible to read it in again (e. g. if you specify no data separator).
Note that if the destination location is a remote URL not all options are available because in general it’s not possible to determine whether the remote location exists. In this case it will always be overwritten.
Lesson end!
Lesson 2 completed. Move to lesson 3, where I’m going to show you how to filter data, with simple steps, easy walk through, screenshots etc. Using the KNIME Row Filter Node is a smart next step as you learn to become an analytics application developer, or maybe you’re just tired of having to go your entire life manually filtering data over and over and over!
KNIME – CSV Writer – Dialog Options -Settings
General settings regarding the output file location and formats.
Output location
- Enter a valid file name or URL.
- You can also choose a previously selected location from the drop-down list, or select a local file from the “Browse…” dialog.
Write column header
- If checked, the column names will be written out in the first line of the output file.
Don’t write column headers if file exists
- If checked, the column headers will not be written when the output is appended to the already existing output file.
- This is particularly useful when the CSV Writer is used in a loop to report results.
- This option is ignored when the column header is not written anyway or the file append option is unchecked (see below).
Write row ID
- If checked, the row IDs will be added to the output, as first item in each line.
Compress output file (gzip)
- Compress the output file in gzip format.
- If enabled, you will not be able to append to an existing file.
If file exists…
- Specify the behavior of the node in case the output file already exists.
- Overwrite will replace any existing file
- Append will append the input table to the end of the file (possibly skipping the column header)
- Abort will issue an error during the node’s execution (to prevent unintentional overwrite)
KNIME – CSV Writer – Dialog Options – Advanced
In the Advanced tab, you can specify the character(s) that will be written out between the data items.
Data Separator
You can use “\t” for a tab or “\n” for a new line character (and must use “\\” for a backslash) in any character sequence.
Missing Value Pattern
- In the Advanced tab, enter a pattern that will be written out for missing data values.
- Note, the missing value pattern will never be put into quotes (see below).
KNIME – CSV Writer – Dialog Options – Quotes
- In the Quotes tab, you can enter a left and right quotation mark pattern.
- Also, select a mode, which determines when quotation marks should be placed around the data item.
- When quotes are used (in every mode other than “never”) you must also specify a replacement pattern for the right quote.
- If it appears in the data item, it must be replaced (so it won’t be confused with the actual closing quote).
Quote Mode: always
- Every data item written out is placed between quotation marks. (The missing value pattern is not quoted though.)
Quote Mode: if needed
- Quotes are only placed around a data item that contains the data separator (specified in the Advanced tab) or if it equals the missing value pattern.
- The right quote pattern will be replaced if it appears in a quoted data item.
Quote Mode: non-numerical only
- Integer and floating point numbers are not quoted, all other data items are.
- (Selecting the decimal point as data separator will lead to an output that can’t be read in again.)
- The right quote is replaced in quoted items.
Quote Mode: never
No data item is placed between quotation marks. You should specify a replacement pattern for the data separator, if it occurs in the data item.
KNIME – CSV Writer – Dialog Options – Comment Header
- In the Comment Header tab you can add a comment header to the beginning of the output.
- Either specify your own comment line(s) or choose from the predefined items.
- If you check one of the options you must also enter a comment begin and comment end pattern.
Header Content: the current creation time
- If checked, a comment line with the current time and date is added.
Header Content: the user account name
- If checked, the login name of the user that created the file (probably you!) is inserted.
Header Content: the input table name
- If checked, a comment line is added showing the name of the table the data was read from.
Header Content: this text
- If you check this, you can enter any text, that will be added then to the comment header.
- Use “\n” to start a new line, and “\t” to insert a tab character (and “\\” to produce a backslash).
Comment Pattern
- If you have checked at least one of the content options, you must provide comment begin and end patterns that are placed around the comment header then.
- If you omit the end pattern the begin pattern is placed at the beginning of each comment line (assuming single line comments, in contrast to block comment if you specify both patterns).
KNIME – CSV Writer – Dialog Options – Decimal Separator
- In the tab “decimal separator” you can enter a character that is used as decimal separator for floating point numbers.
- It replaces the default character ‘.’ then.
Line Ending
- In the tab “Advanced” you can select the line endings that are written to the file.
- Default value is the system default value, which is system dependent (LF on Linux/Unix systems, CR+LF on Windows systems).
- You can enforce a certain line ending to generate a file that is readable on a different operating system.
KNIME – CSV Writer – Dialog Options – Encoding
File Encoding
To write a csv file with a different encoding, you can select a character set in this tab (UTF-8, UTF-16, etc.), or specify any other encoding supported by your Java VM.
The default value uses the default encoding of the Java VM, which may depend on the locale or the Java property “file.encoding”
Ports
Input Ports
| 0 | The data table to write out. |