Welcome to the Google Analytics Connection node blog. It’s a relatively short blog as most of the work has gone to getting your google API service account setup and authentication steps. Setting up your Google Authentication API Key is your first step before you begin this blog! Which we covered in our previous article here on knime.dev!
Your Google Analytics Connection node in KNIME will turn on when you have your Google Authentication API Key setup correctly.
If you’re looking at the screen and it’s not automatically refreshing data, you’re needing to pause here and go back to the previous step.
Google Analytics Connection node in KNIME is an automated capturing node. It captures all the data that’s relevant to your service account access. If you have access to your clients Google Analytics connection VIA the service account email, then you are able to see your client website account and all associated properties to your access.
Giving access is covered in the previous blog too.
Next step, we will open the Google Analytics connection, given our previous step of Google Authentication API key is completed and correct, this is a “no brainer” wizard!
The Google Analytics Connection node in KNIME explained
The google analytics connection either works or doesn’t because of an error, making it rather easy to troubleshoot downstream if you setup the service email account correctly!
Next, open the configuration.
If you don’t see something like this screenshot, it’s likely due to an error in the previous step, and not this step.
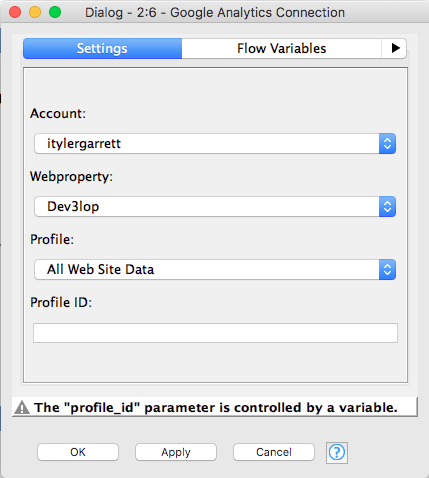
Notice I’m utilizing a parameter for profile ID, this means I’m pushing a list of values through the profile ID, and looping through all of my websites for this particular data pipeline.
Account: is where you will find multiple accounts depending on your access to these accounts.
Webproperty, is swap-able in this and the profile ID which is “hiding numbers”, will show numbers. I’m hiding numbers for security purposes, just playing it safe.
Note, as you swap properties, it will swap the profile ID that is relevant to your Google Analytics environment.
Click okay. Depending on how you want to upgrade this tool in the future, note it’s rather straight forward to run your flow variables through these different drop downs or inputs. I prefer utilizing profile id because I’m able to control it utilizing a key. Then in front of these nodes I can later anonymize the profile id, and only show the website.
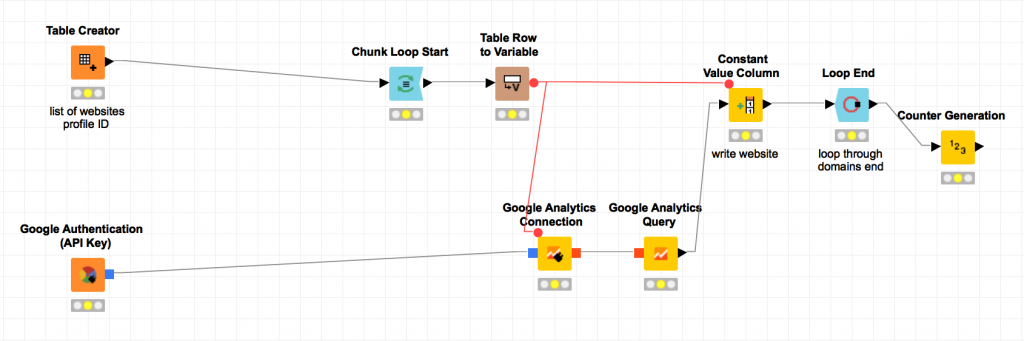
List of properties comes from the table creator.
Hiding the “profile IDs” which can be found in your google analytics portal online, or when using the drop down.

We can drive the profile id input, utilizing this table creator option and passing flow variables to other tools down the pipeline to ensure we are able to capture this data at a row level, enabling us to filter between websites, which is in column 1. As long as we hide column 2, we can start using websites as a filtering dimension on the front-end.
Next, drag and drop your Google Analytics Query node to the KNIME workflow screen. We will cover this in our next blog.
Recent Comments