KNIME Row Filter Node is WHERE you want to be when you want to FILTER… SQL jokes aside – this node helps you automate row level filters across a column of data.
I want to ensure you understand how to use the row filter tool because you will use this tool and the row splitter node a lot, and it will be one of your go-to tools for a lot of solutions. That’s why I’m going to break it down into little pieces below and explain everything in a verbose manner with gifs.
The Knime Row Filter Node has a lot of variations and capabilities, mostly I enjoy the fact that I can copy paste it multiple times and apply a wild card filter or other simple filters without having to question myself.
Below, I will offer different configuration settings – to help non-technical users understand how to filter data. If you’re technical, it will pay to know these steps because it will teach you advanced ways to use the software!
Know filtering data with KNIME is easy but they do offer a lot of advanced ways to filter, if you pick the wrong filter node, you will likely get confused or frustrated – have no fear.
This particular direction is your first step into filtering, at a row level!
Find the KNIME Row Filter node in the Node Repository, within IO, Row, Filter, boom — time to filter your rows.
This Row Filter – compared to other filtering done in KNIME may feel awkward at first, I bumped my head against a few different filters before finding this node!
KNIME, for previous ETL or SQL professionals, may feel a little strange.
Sometimes a strange way of thinking is what you need to build analytics applications.
And on your way to becoming an analytics app developer, you probably want to get familiar with how this product filters… Understandable.
If you’re familiar with the basics in SQL, this would be similar to your WHERE clause, but not completely, check out the settings and play with the tool because it’s free… And you can automate filtering content from a row perspective.
If you’re familiar with Alteryx, this would be your FILTER TOOL!
But in Alteryx, you’re thinking “where’s my TRUE and FALSE value?” Right.. where is the false value going?
I understand, you’re expecting the other stream of data (false data) to pipe to another node in your workflow. You’re thinking of the KNIME Filter Splitter tool!
Using Row Filter
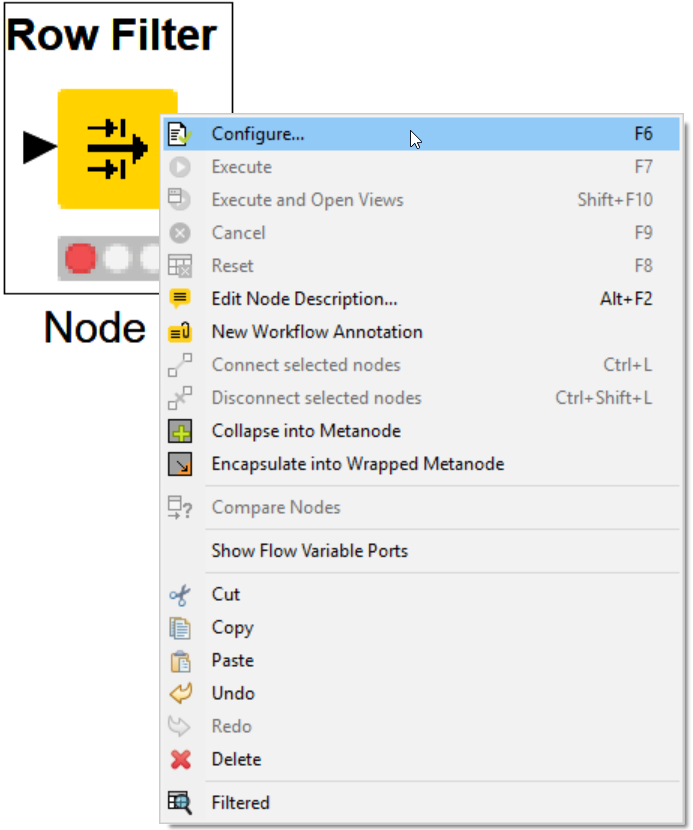
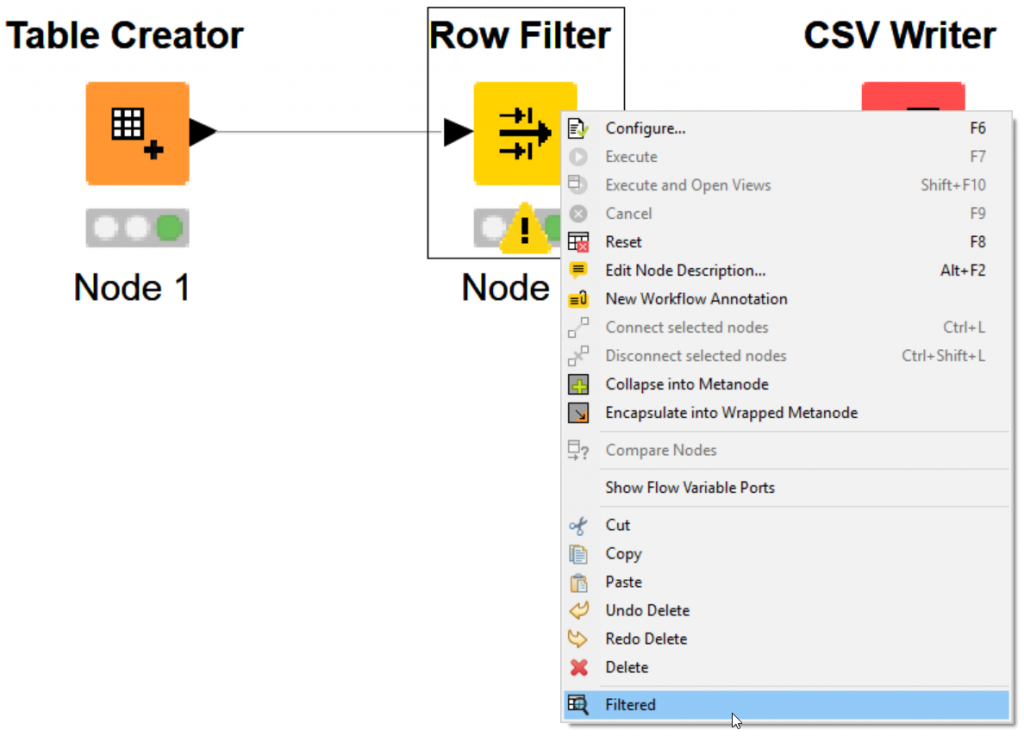
Let’s begin configuring our Row Filter Node by right clicking the node!
Left click Configure…
KNIME Row Filter configuration offers a lot of power within one pane!
There is a layering of “advanced automation” by clicking check boxes.
Lucky for you and me, it’s a very easy user experience for doing basic matching and row filtering.
Playing with the KNIME Row Filter node, by copying and pasting it several times, will be the very best way to learn – if you’re a power user.
This trick works great if you’re simply not in the mood to learn a node, you can copy paste it, and run the entire workflow, jumping between each node and investigating the difference!
by tyler garrett
How to use the KNIME Row Filter Node
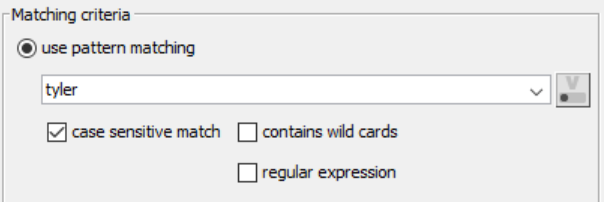
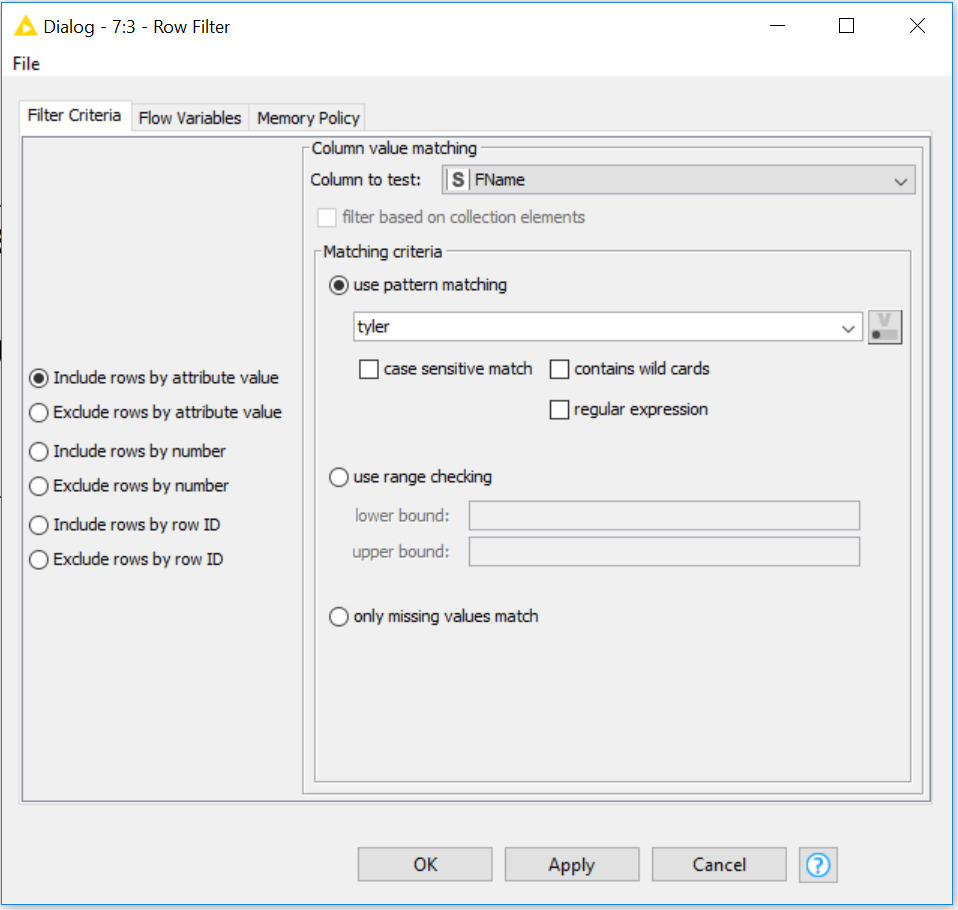
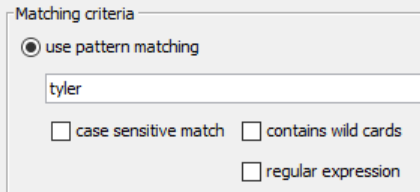
When your Row Filter node Dialog pops open – type what you’re looking to begin matching. Luckily no changes are necessary to do a “string” match filter. However, this node is deeper than simple string=string!
During the rest of the blog, let’s keep our configuration the same.
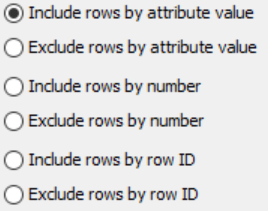
We won’t change our “include rows by attribute value.” Leaving this allows us to match “positive” matches and filter to only the positive matches. Changing this setting will help you dig deeper.
I’m going to walk you through a process of learning, follow this process, and at the end I’m going to teach you how to do all of it – more efficiently. Understanding the difference, will be a huge leap for you in your analytics automation career.
If you are following our series, you can type Tyler in the dialog to match only the rows with Tyler and push this change to our KNIME CSV Writer node.

Typing only Tyler, will suffice at “matching” for Tyler!
Checkbox for case sensitive match offers the ability to “care about caps.”
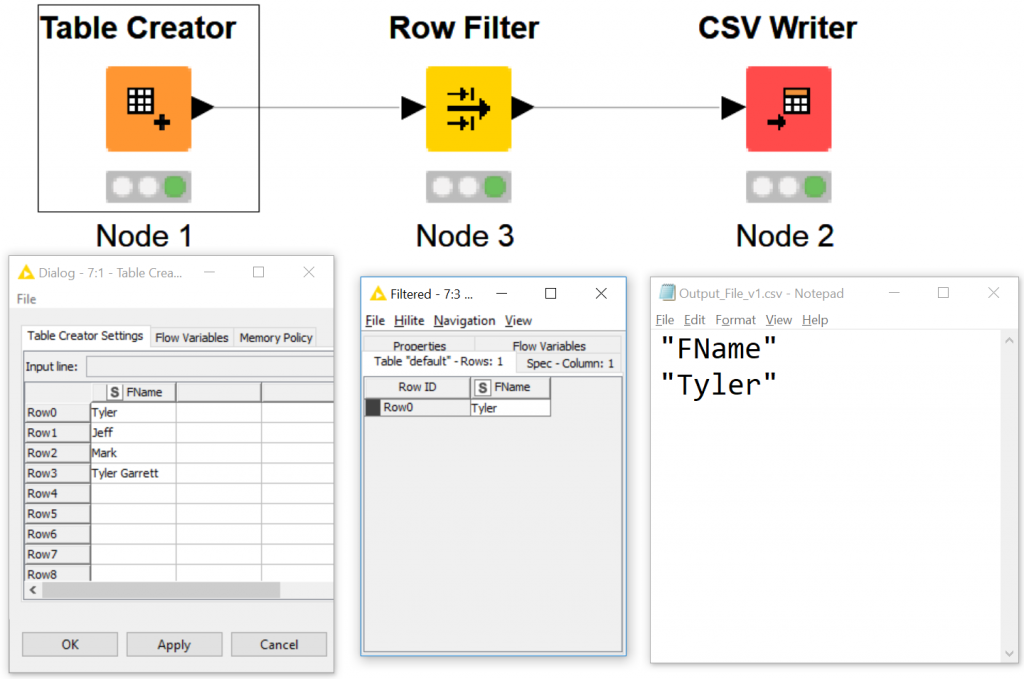
After you execute your workflow – KNIME Row Filter node will throw an error flag because
Notice how the CSV Writer did not throw an error…
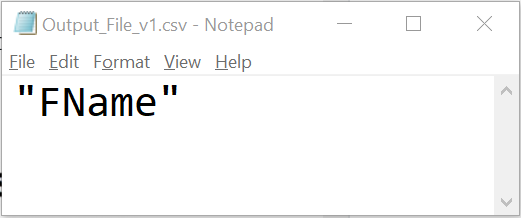
Even though the data did not filter, the CSV writer wrote a header!
Case sensitive match checkbox is powerful depending on the use case and the software doing this for free is pretty awesome too!
Let’s discuss the logic of what just took place.
We checked a box with case sensitive match & typed lower case “tyler.”
It resulted in not finding any matches. Because;
(our data has the value) Tyler and that can’t equal tyler.
Tyler=tyler is not possible – KNIME throws an error, and outputs a header to our CSV Writer.
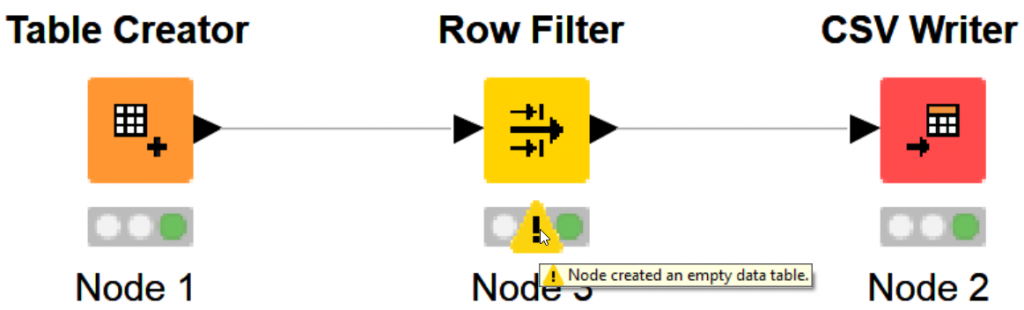
Highlighting the error exclamation mark – we see “Node created an empty data table.” This isn’t necessarily a negative message, rather an explanation of what transformations we have developed. We are technically still sending a stream to the KNIME CSV writer and still writing a CSV.
Now, we understand hows case sensitivity works.
The data table KNIME is referring to is built into the right click function.
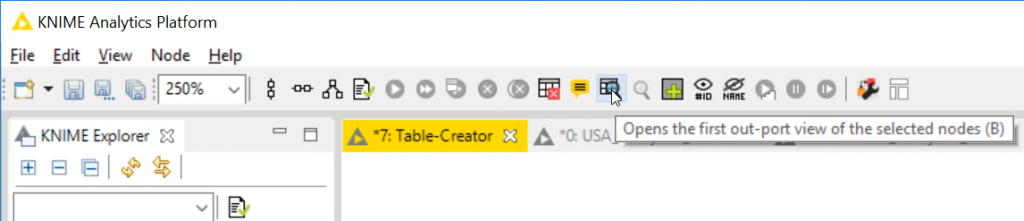
You can click “Filtered” – please notice the icon too. It’s a magnifying glass on a data table.
This icon is also on the top.
I did not the default macro offered and changed my button to B. Will explain this in a future blog and share my mapping.
The goal here is to show you what is happening from end to end.
If you open your selected node data window, you will see there’s no data passing through because Tyler does not equal tyler!
And to make us sound smarter – I will say, <> as does not equal because that’s what it means!
Tyler <> tyler — and because of that… no data goes through!
Row Filter node in Action
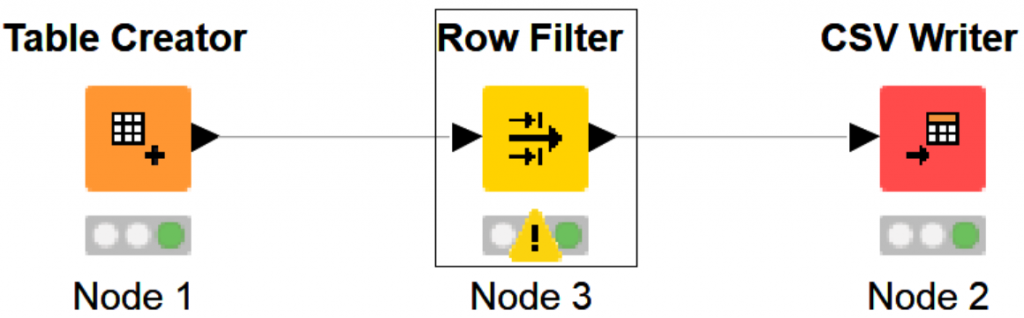
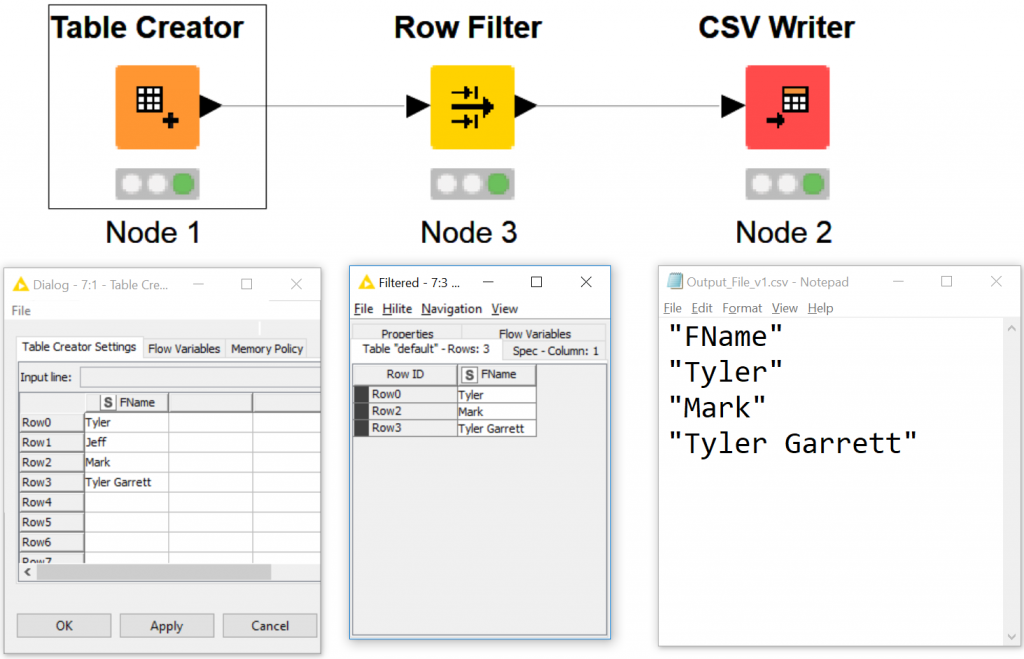
The KNIME Row Filter, including our upstream and downstream nodes, will have a cached set of data.
You can see how the data passes from Table creator, to Row Filter, and out to CSV Writer. Displaying the logical steps, inputs, and outputs below.
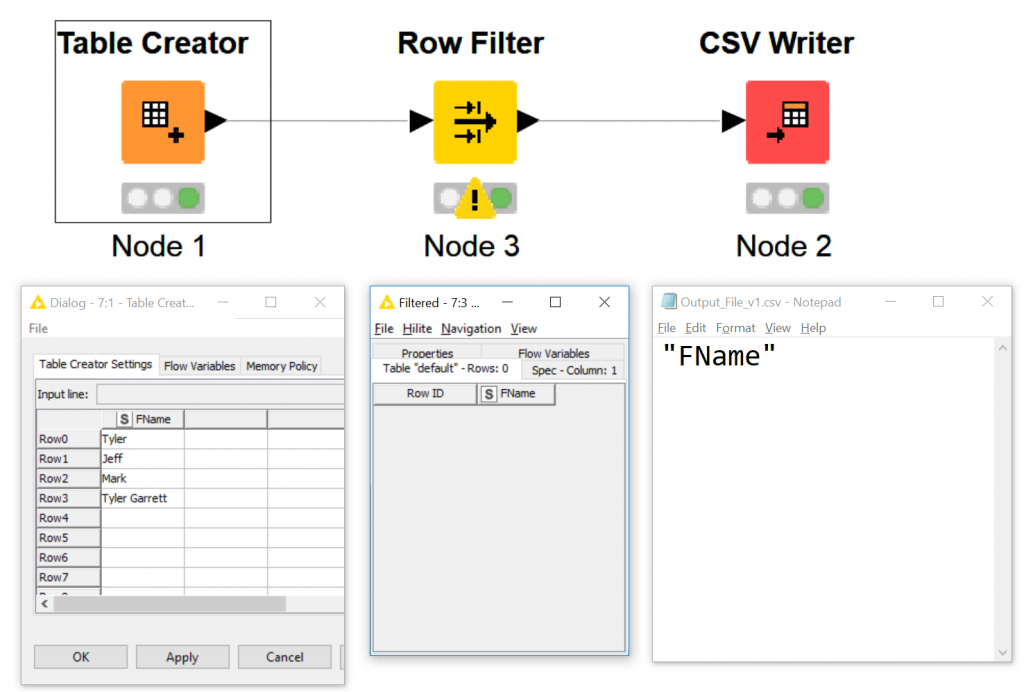
Above you can see we need to update our filter. If we are not passing any data through Row Filter, we are not able to understand what rows have a positive match of Tyler.
Open your config again for the Row Filter node.
Deselect case sensitive match!
Execute the workflow.
Notice tyler = Tyler, if we don’t select case sensitive match.
That stands to say, KNIME is helping you automatically handle case sensitivity, without transforming the data you can handle case sensitivity with this checkbox. It’s pretty rad.
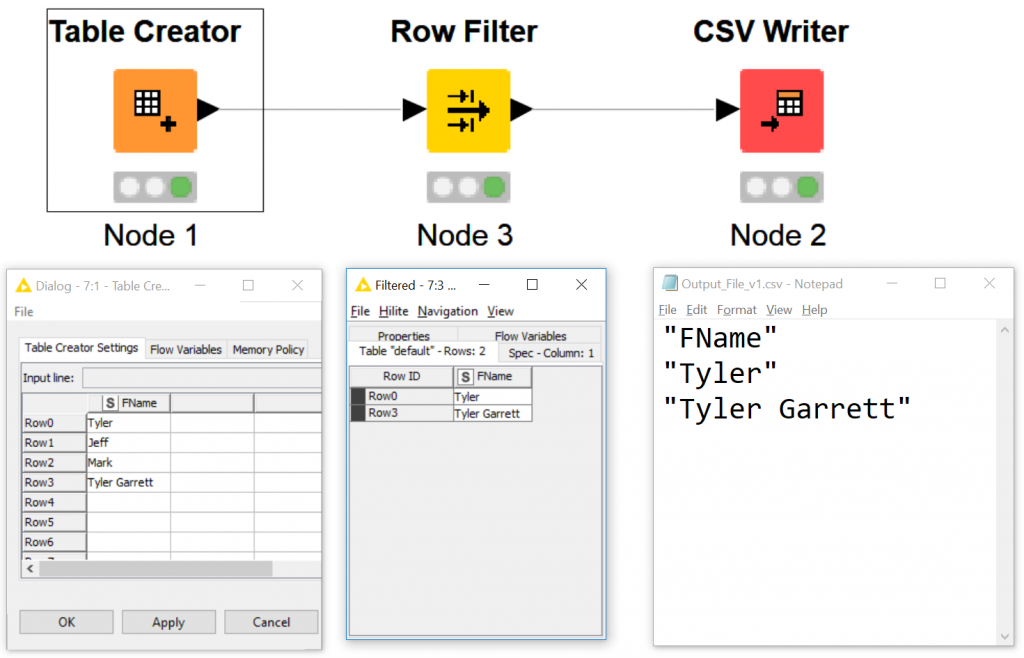
But Tyler, you say.. “We want to capture every row of data including Tyler…”
Change the configuration again.
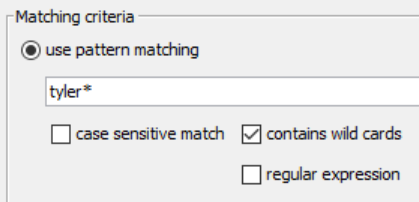
- add *, after tyler
- check the contains wild cards
- click OKAY
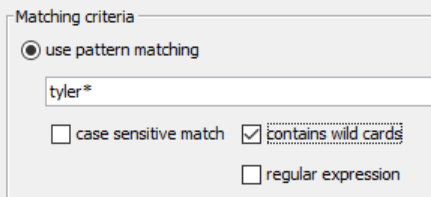
If you match the above screenshot, you’re effectively saying “gimme all that tyler goodness.” The wild card here is the asterisk. And leaving case sensitive match turned off, it’s essentially giving me a tiny “SEARCH, FIND, & FILTER.”
Execute your nodes. Using the Row Filter node, we were able to find everything in our data, at a row level, that has “tyler”… awesome.
To ensure we understand what the asterisk or ( * ) helps you, here’s one more use case for you to practice.
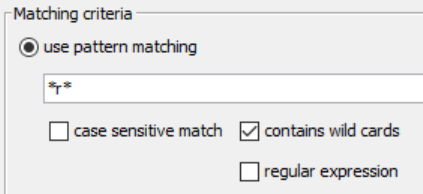
Open the configuration, and change text from tyler* to *r*. We want to see every row of data with the letter r.
We are finding an occurrence. When was the letter “r” used in our data, at a row level, and output a csv with that data.
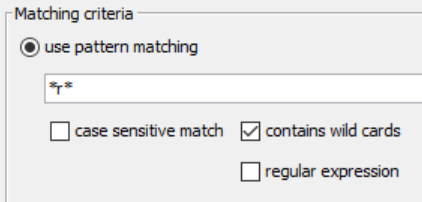
Click okay, and execute your nodes. You will now have “Mark”, Row2, in your output.
Now that you understand the basic functions of filtering with the Row Filter tool and get excited because this type of filtering you learned above will be easier as you progress because it will be largely the same user experience!
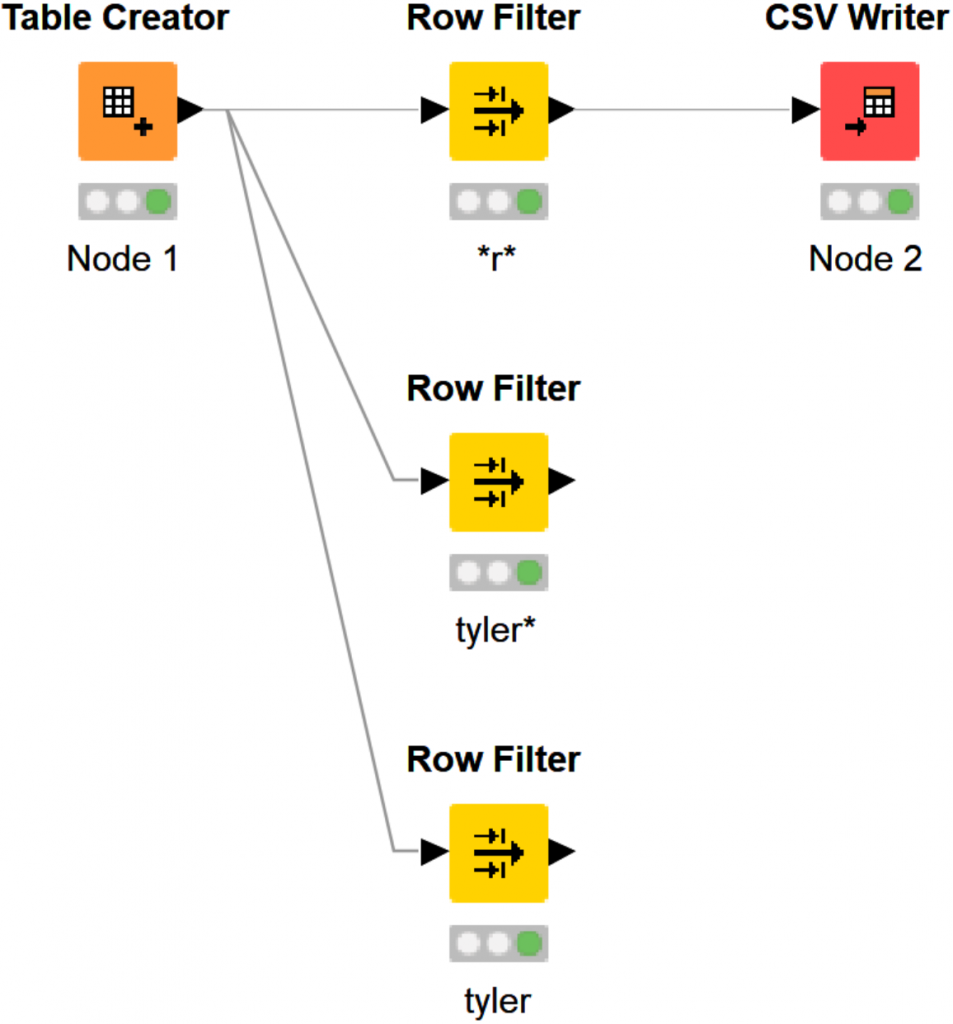
Let’s see how we could have done the above steps, without changing our filter 3 times.
I realize – this may sound odd but stick with me here because, in my opinion, knowing how to iterate failure is the essential difference between advanced users and simple users.
Copy and paste your Row Filter Node 2 more times!
- left click row filter
- CTRL+C
- CTRL+V x2
- Connect the nodes!
Update each KNIME Row Filter node to filter something different, attach your pipelines and execute!
For each variation, make a new Row Filter node. Copy and paste nodes until it makes sense and never be afraid to leave your old development, and leave it available to access in the future.
Use case – finding every row with the letter r.
Finding patterns matching ‘tyler*’
Find matching ‘tyler’
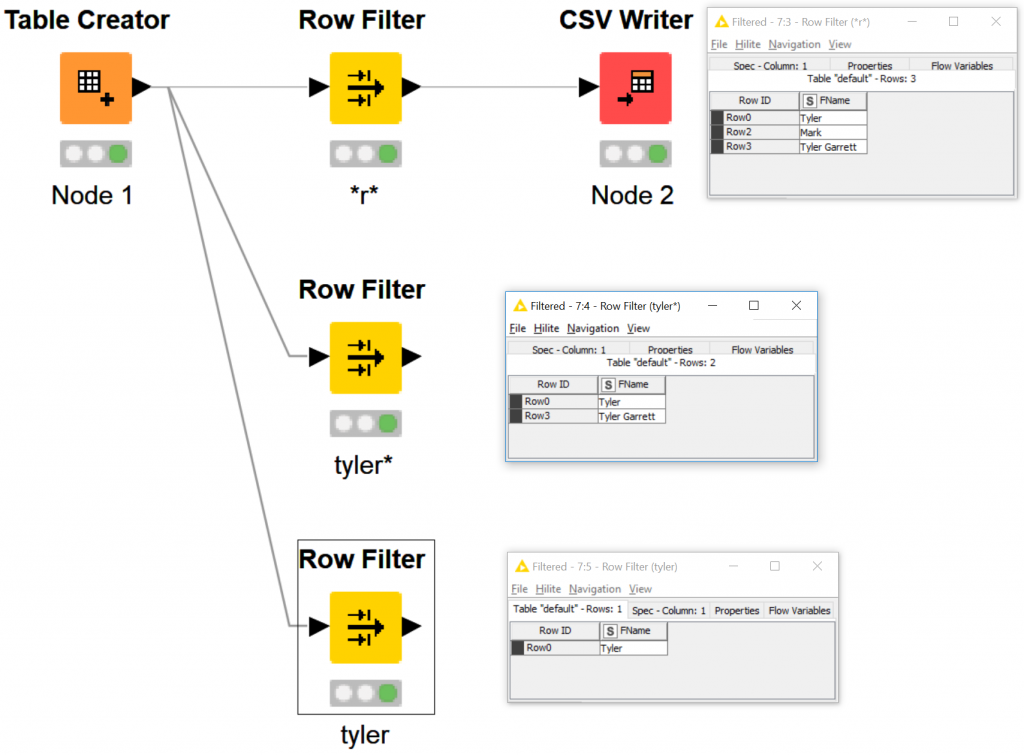
Let’s see what that looks like when complete and labeled.
To rename Node #, double click the value.
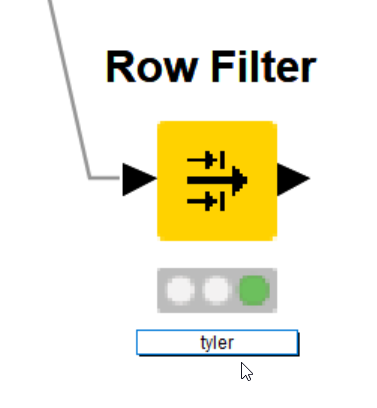
You can edit the naming conditions, and leave tiny notes to help you keep track of what filters you’re using.
Drag your mouse over all 3 Row Filters.

You can highlight more than 1 node, and open all of the cached data tables at once. Using my macro button, I hit B.
After organizing the data windows on top of the KNIME screen, you should have something like the following.
More to come soon! Plenty to learn here.
Lesson end!
Lesson 3 is complete, move to lesson 4! You will learn how to read files, yes there is a CSV reader, but it does not work as easily as the KNIME File Reader Node, which automates handling bringing the data INTO Knime! Learning to INPUT data into KNIME is important!
KNIME explains Row Filter Node
KNIME > Node Descriptions > Manipulation > Row > Filter
The node allows for row filtering according to certain criteria. It can include or exclude: certain ranges (by row number), rows with a certain row ID, and rows with a certain value in a selectable column (attribute). Below are the steps on how to configure the node in its configuration dialog. Note: The node doesn’t change the domain of the data table. I. e. the upper and lower bounds or the possible values in the table spec are not adapted, even if one of the bounds or one value is fully filtered out.
KNIME – Row Filter – Dialog Options
In- or exclude rows by criteria
- You must first select which criteria should be used for filtering from the left-hand side.
- Also choose whether to include or exclude rows according to the selected criteria.
- Depending on the choice, you will then have to adjust the filter parameters in the right-hand panel.
Column value matching
- If filter by attribute value is selected, select the name of the column whose value should be matched.
- If the selected column is a collection column the filter based on collection elements option allows to filter each row based on the elements of the collection instead of its string representation.
- Then, either enter a pattern for string matching, or a value range, for range filtering.
- When using a pattern match, you can set check marks according to whether the pattern contains wildcards or is a regular expression.
- Wildcard patterns contain ‘*’ (matching any sequence of characters) and ‘?’ (matching any one character).
- Examples of regular expressions are given below. Also, a case sensitive match can be enabled by the according checkmark.
- Note: if you select a pattern from the drop-down menu of the pattern text field, the node still performs a comparison of the string representation of the data values.
- If a range is specified, and you specify only one boundary, the other is then set to (plus or minus) infinity.
- Here are some examples of regular expressions: “^foo.*” matches anything that starts with “foo”.
- The ‘^’-character stands for the beginning of the word, the dot matches any (one) character, and the asterisk allows any number (including zero) of the previous character.
- “[0-9]*” matches any string of digits (including the empty string).
- The [ ] define a set of characters (they could be added individually like [0123456789], or by range). This set matches any (one) character included in the set.
- For a complete explanation of regular expressions see e.g. the JavaDoc of the java.util.regex.Pattern class.
Row number range
- If filter by range is selected, specify the first row number to in/exclude.
- The end of the range can either be specified by row number, or set to the end of the table, causing all remaining rows to be in/excluded.
Row ID pattern
- If filter by row ID is selected, specify a regular expression, which is matched against the row ID of each row.
- A checkmark can be set, if a case sensitive match should be performed and if the row ID should start with the specified pattern.
More Information
Find more information here:
Ports
Input Ports
| 0 | Data table from which to filter rows. |
Output Ports
| 0 | Data table with rows meeting the specified criteria |
This node is contained in KNIME Core provided by KNIME AG, Zurich, Switzerland.
Update 1/21/21 by Tyler Garrett to contain the row splitter node click through and updated the text under header 1 to make the blog more clear when trying to understand the knime row filter node for beginners and advanced users. Remove links captured during copy paste from other wikis to reduce the broken linking.